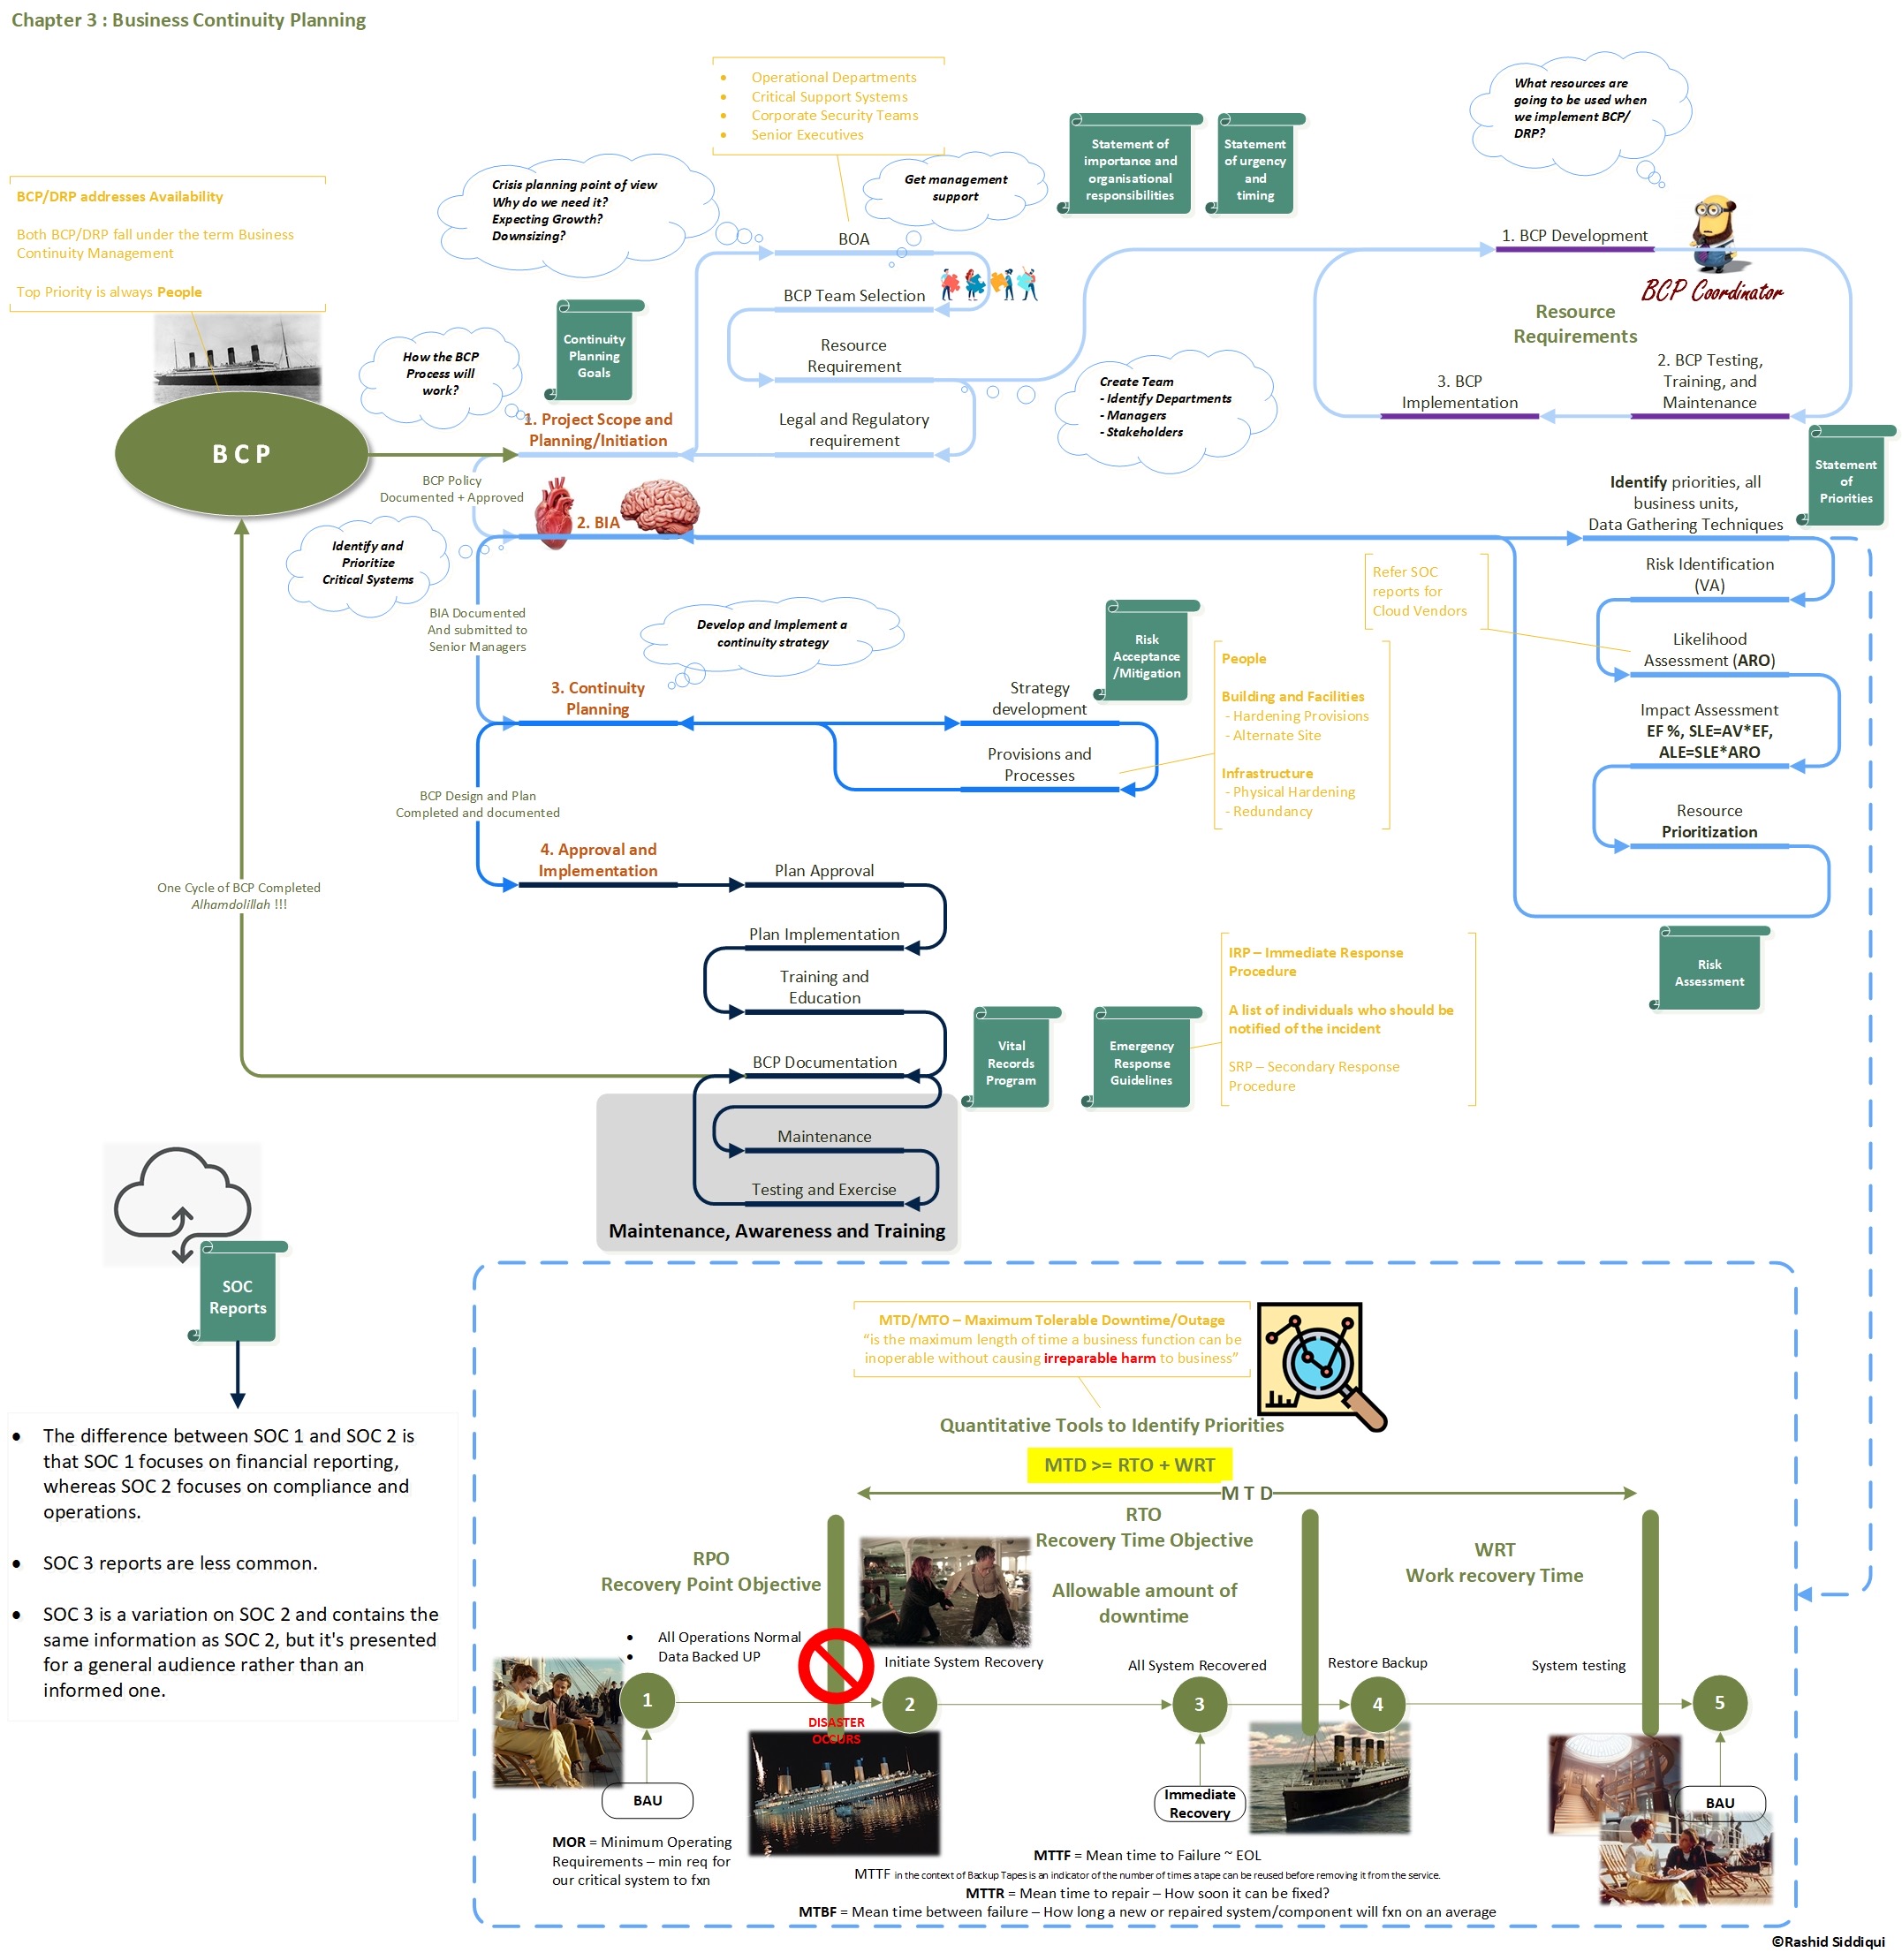
CISSP Infographics: BCP
December 17, 2021


This article is the outcome of my deployment experience of Arbor SP. The purpose of this document is to give network administrator and security professional an easy reference to quickly look and find the operational tools in managing Arbor SP and TMS Appliances.
This writing will delineate the operational commands tips and tricks for SP Leader, Collector and TMS appliances. The SP software flavour is almost same and the command line is identical in most of the situations.
SYSTEM HEALTH CHECKS
At times it is required to do a system health-check in various varying situations. Following commands are quick and handy.
System Information
admin@Arborpeakflow:/# system show
General system information:
System name: Arborpeakflow
Screen length: 24 (default)
System timezone: UTC
Version: Peakflow SP 7.6.2 (build GDUD-B)
Boot time: Tue Oct 10 10:26:05 2017, 9 days 19:38 ago
Load averages: 0.02, 0.07, 0.12
BIOS Version: 6.00
System Board Model: vmware
System Model Number: N/A
Serial Number: VMware-564d06d94a6745cd-b02b4eb793f91c73
Processor: Intel(R) Xeon(R) CPU E5-2690 v3 @ 2.60GHz (2 total cores)
Memory Device: 8192 MB RAM slot #0 RAM slot #0
System attributes:
shell.enabled = 1
Idle timeout: 0 (default)
Appliance mode: disabled
FIPS mode: disabled
HSM: not present
Acknowledgement query: disabled
Acknowledgement string: Continue (Yes/No)?Banner:
Welcome to ArbOS
admin@Arborpeakflow:/#
Detailed health report
system lines set 50
ser sp license flex cap
system file show
system disk show
sys disk firm show
system files directory disk:
system hardware
shell
statusdump -a
df -kh
df -ih
echo ‘select count(*) from alert;’ | base pgwrap psql sp
echo ‘select count(*) from alert where is_deleted;’ | base pgwrap psql sp
echo ‘select * from sizes order by size_kb desc limit 10;’ | base pgwrap psql sp
echo ‘select count(*) from sync_deleted;’ | base pgwrap psql sp
echo ‘select count(*) from dos_mo_profiled;’ | base pgwrap psql sp
echo “select count(*) from alert where start_time > now() – interval ‘1 day’;” | base pgwrap psql sp
echo ‘status-pflicense’ | nc localhost 1111
dumpe2fs -h /dev/sda4 | egrep -i ‘mount count|Check interval|Next check after’
grep ‘type=”external”‘ /base/data/interface/interface.xml | wc -l
grep ‘interface.*.detailed’ /base/etc/peakflow/save/sp.conf | head
grep -c ‘interface.*.detailed.*on’ /base/etc/peakflow/save/sp.conf
comsh -c “/ services sp deployment” > /base/data/files/deployment.txt
egrep -i ‘Appliance Name|FPS|Appliance IP|Appliance Model|Appliance Type|CPU Load|Flows/s|Serial|License Mode|Managed Objects Matched per Flow|Memory Usage|Short-Term’ /base/data/files/deployment.txt | sed ‘s/Appliance Name/\nAppliance Name/g’exit
Now below is only from leader:
From Leader:
To verify if ‘Route Target’ is configured:
UI – Administration > Mitigation > TMS Groups > <click on TMS group> > Diversion > Flow Specification Diversion
or
From the CLI of the leader, run “/ services sp mitigation groups show commands” and look for any lines that contain the route_target key.
/ser sp mitigation groups show commands
shell
comsh -c “/ services sp deployment” > /base/data/files/deployment.txtegrep -i ‘Appliance Name|FPS|Appliance IP|Appliance Model|Appliance Type|CPU Load|Flows/s|Serial|License Mode|Managed Objects Matched per Flow|Memory Usage|Short-Term’ /base/data/files/deployment.txt | sed ‘s/Appliance Name/\nAppliance Name/g’
grep ‘type=”external”‘ /base/data/interface/interface.xml | wc -l
exit
Setting up hostname
admin@arbos:/# system name set Arborpeakflow
admin@Arborpeakflow:/#Adding NTP Servers
admin@Arborpeakflow:/# services ntp server add 10.1.1.2 global
admin@Arborpeakflow:/# services ntp server add 10.1.1.3 global
admin@Arborpeakflow:/# services ntp server add 10.1.1.3
admin@Arborpeakflow:/# services ntp server add 10.1.1.2admin@Arborpeakflow:/# services ntp show
NTP service status:
Status: running, synchronized
Active NTP configuration:
10.1.1.3
10.1.1.2
Local NTP configuration:
10.1.1.3
10.1.1.2
Global NTP configuration:
10.1.1.2
10.1.1.3
admin@Arborpeakflow:/#
Adding DNS Servers
admin@Arborpeakflow:/# services dns server add 10.1.1.4 global
admin@Arborpeakflow:/# services dns server add 10.1.1.5 global
admin@Arborpeakflow:/# services dns show
DNS service:
Active DNS Servers:
10.1.1.4
10.1.1.5
DNS hosts file: none
Local DNS Servers:
10.1.1.4
10.1.1.5
Global DNS Servers:
10.1.1.4
10.1.1.5
admin@Arborpeakflow:/#
Configuring Proxy
admin@Arborpeakflow:/# services sp proxy http ip set 10.1.1.6
admin@Arborpeakflow:/# services sp proxy http port set 8080
admin@Arborpeakflow:/# services sp proxy http enable
admin@Arborpeakflow:/# services sp proxy http show
Proxy Configuration:
Bind Source IP: enabled
Status: enabled
IP: 10.1.1.6
Port: 8080
User:
Password:
Auth method: none
admin@Arborpeakflow:/#
Copying file in the Arbor
admin@Arborpeakflow:/# system files copy scp://adminusername@192.168.100.50:/export/home/adminusername/LicenceFileName.bin disk:
Warning: Permanently added ‘192.168.100.50’ (RSA) to the list of known hosts.
Password:
LicenceFileName.bin 100% 14KB 13.8KB/s 00:00
admin@Arborpeakflow:/#
admin@Arborpeakflow:/# ssh
Viewing files in the Arbor
admin@Arborpeakflow:/# system files directory disk:
Directory listing of device disk:
Filename Kbytes Date/Time Type
LicenceFileName.bin 13 Sep 7 04:49 Unknown
ssh_host.keys 20 Aug24 03:57 SSH host keys
ssh_known_hosts 1 Sep 7 04:49 Text file
Free space: 10.0G of 10.0G (0% used)
admin@Arborpeakflow:/#
License Import
admin@Arborpeakflow:/# services sp license flexible import disk:LicenceFileName.bi
admin@Arborpeakflow:/# services sp license flexible server show
License Server URL:
Cloud Licensing: disabled
admin@Arborpeakflow:/# services sp license flexible show”
Adding new Arbor as a backup leader
admin@Arborpeakflow:/# services sp bootstrap nonleader 192.168.100.50 secret_key
bi Device Type
cp Device Type
fs Device Type
pi Device Type
admin@Arborpeakflow:/# services sp bootstrap nonleader 192.168.100.50 secret_key pi
<cr>
admin@Arborpeakflow:/# services sp bootstrap nonleader 192.168.100.50 secret_key piExisting Alert and Mitigation database detected.
Type bi for the data storage role, cp for the traffic and routing analysis role, fs for the Flow Sensor appliance, and pi for the user interface role. The Flow Sensor appliance is only applicable with appliance-based licensing.
The Alert and Mitigation database contains alert information collected
by this device for the deployment which it is a part of.
If this device was last used in a different deployment, then you should
delete the existing database.Would you like to delete the existing Alert and Mitigation database? [y] y
Configuring Arborpeakflow
Leader IP: 192.168.100.50
Zone secret hash: b7a2fd3102b77366f848264d57149d04
Existing database: deleteCommit (and activate) configuration? [n] y
Deleting existing Alert and Mitigation database
Deleting alert and mitigation data. This could take a while……………….done.
Rebuilding alert and mitigation database………………………………………………………………………………………………………………………………………………………………………………………………………………………………………………………………………………………………………………………………………………………………………………………….done.
Saving ArbOS configuration…
Saving SP configuration…
Boot-strap configuration committed
admin@Arborpeakflow:/#
Command to check the status of leader and collector
admin@Arborpeakflow:/# services sp device show
admin@Arborpeakflow:/# services sp start
Starting Peakflow SP services……done.
Command to enable Shell
admin@Arborpeakflow:/# system attributes set shell.enabled = 1
admin@Arborpeakflow:/#
Command to check database status
admin@Arborpeakflow:/# shell
DIAG> echo “select count(*) from attack;” |base pgwrap psql sp
count
——-
6385
(1 row)DIAG> echo “select count(*) from alert;” |base pgwrap psql sp
count
——-
15056
(1 row)DIAG> echo “select count(1) from attack where start > now() – interval ’24 hours’;” | base pgwrap psql sp
count
——-
31
(1 row)
Command to check syslog convergence
DIAG> cd /base/var/log
DIAG> cat syslog |grep -i convergence
Sep 7 05:45:14 Arborpeakflow db_sync[13254]: [W] Convergence reached. sync_deleted will be considered as already synced from ‘Jan 01 1970 00:00:01’ to ‘Sep 07 2017 05:39:39’
DIAG>
Command to check heartbeat status of all collectors and leaders
DIAG> cat /base/data/tmp/heartbeat/heartbeat_summary
115|Arborpeakflow|192.168.100.50|up|secret_key||0|
Command to copy Syslog file from Arbor to Jumpbox
DIAG> pwd
/base/var/log
DIAG>
DIAG> ls -l
total 137160
-rw-r–r– 1 root root 528384 Sep 29 01:39 arbos_logindrwxr-xr-x 2 root root 4096 Aug 16 17:18 llsd
-rw-r–r– 1 root root 863449 Sep 29 01:26 redis_log
-rw-r–r– 1 root root 28061215 Sep 19 16:26 rsyncd
lrwxrwxrwx 1 root root 13 Aug 16 17:18 sa -> /base/data/sa
-rw-r—– 1 root root 177593 Sep 29 01:26 stunnel_log
-rw-r–r– 1 root root 48276328 Sep 29 01:44 syslog
-rw-r–r– 1 root root 5292878 Sep 26 14:25 syslog.0.gz
-rw-r–r– 1 root root 5389250 Sep 23 04:36 syslog.1.gz
-rw-r–r– 1 root root 5337812 Sep 19 18:01 syslog.2.gz
-rw-r–r– 1 root root 4959255 Sep 29 01:19 syslog.3.gz
-rw-r–r– 1 root root 7447353 Sep 29 01:44 uilog
-rw-r–r– 1 www www 26350130 Sep 29 01:44 www_access
-rw-rw-rw- 1 root root 2568905 Sep 23 16:27 www_access.0.gz
-rw-r–r– 1 root root 178263 Sep 29 01:26 www_errorDIAG> scp syslog.* adminusername@192.168.100.50:/export/home/adminusername/
Password:
syslog.0.gz 100% 5169KB 5.1MB/s 00:00
syslog.1.gz 100% 5263KB 5.1MB/s 00:00
syslog.2.gz 100% 5213KB 5.1MB/s 00:01
syslog.3.gz 100% 4843KB 4.7MB/s 00:00
DIAG>
DIAG> scp syslog adminusername@192.168.100.50:/export/home/adminusername/
Password:
syslog 100% 46MB 23.0MB/s 00:02
DIAG>
How to find the secret?
DIAG> cat /base/etc/peakflow/save/sp.conf |grep -i secret
::set {collector.zone_secret} secret_key
DIAG> exit
exit
adminuser@Arborpeakflow:
Diagnostics file creation
admin@peakflow:/# system diagnostic
Generating………………………….done
Diagnostics package saved to: DiagFile-peakflow-DBNK.tbz2admin@peakflow:/# system files directory disk:
Directory listing of device disk:
Filename Kbytes Date/Time Type
DiagFile-peakflow-DBNK.tbz2 19254 Feb14 20:08 Bzip2 compressed
Peakflow-SP-PI-5.8-CK1H-B 236030 Dec18 19:04 Signed package
arbos-5.2-CK1H-B 105194 Dec18 19:03 Signed package
ssh_host.keys 10 Jan25 2012 SSH host keys
ssh_known_hosts 1 Dec 3 19:18 Text file
Free space: 1.1G of 2.0G (47% used)
system files copy disk:DiagFile-peakflow-HLK1.tbz2 scp://adminusername@192.168.100.50:/export/home/adminusername
Creating Backups
from shell go to below directory
/base/data/backup/Below command to check the size of the backup file:
du -sh /base/data/backup/*Backup procedure from cli:
(For CLI,we have to be on the specific devcie from we will start backup and export)
Below is the same using command CLI
Suppose we want to take backup on collector ,then we need to ssh to the collector.
# services sp backup create fullCommand to Export the back once Backup completed:
# services sp backup export full scp://[user@]host[:port]/<dirpath> Destination Scp directory (you can specify the port if you are not using default port)
ex:# services sp backup export full scp://root@10.99.170.10/base/data/backup
Backup example
adminuser@Arborpeakflow:/# services sp backup export full scp://root@192.168.100.50/base/data/soc/backup
root@192.168.100.50’s password:
backup.0 100% 2605MB 37.2MB/s 01:10
root@192.168.100.50’s password:
backup.0.list 100% 14MB 14.4MB/s 00:00
adminuser@Arborpeakflow:/#
adminuser@Arborpeakflow:/# shell
DIAG> pwd
/commands
DIAG>
DIAG> cd /base/data/soc/
DIAG> cd backup/
DIAG> ls
Arborpeakflow-backup-level0.tar Arborpeakflow-backup-level0.tar.list
DIAG>
DIAG> ls -ltr
total 2429780
-rw-r–r– 1 root root 2479166976 Aug 3 14:29 Arborpeakflow-backup-level0.tar
-rw-r–r– 1 root root 6483323 Aug 3 14:29 Arborpeakflow-backup-level0.tar.list
DIAG>
DIAG> ls -ltr
total 2684684
-rw-r–r– 1 root root 2731295971 Sep 13 04:23 Arborpeakflow-backup-level0.tar
-rw-r–r– 1 root root 15119628 Sep 13 04:23 Arborpeakflow-backup-level0.tar.list
DIAG>
DIAG>
New Backup creation
admin@Arborpeakflow:/# services sp backup create full
admin@Arborpeakflow:/# shell
DIAG> cd /base/data/backup/
DIAG> ls
backup.0 backup.0.list backup.log backup_info_full.txt
DIAG>
DIAG> ls -ltr
total 39120
-rw-r–r– 1 root root 55 Jun 26 03:24 backup.log
-rw-r–r– 1 root root 17 Jun 26 03:24 backup_info_full.txt
-rw-r–r– 1 root root 107182 Jun 26 03:24 backup.0.list
-rw-r–r– 1 root root 39889948 Jun 26 03:24 backup.0
DIAG>admin@Arborpeakflow:/# services sp backup export full scp://Arboradmin@10.33.208.93/home/Arboradmin
Warning: Permanently added ‘192.168.100.50’ (RSA) to the list of known hosts.
On the Jumpbox
-sh-4.1$ pwd
/home/Arboradmin
-sh-4.1$ ls -ltr |grep Arbor
-rw-r–r–. 1 Arboradmin SG-ISE-EM-JumpboxAccess 39889948 Jun 26 13:28 Arborpeakflow-backup-level0.tar
-rw-r–r–. 1 Arboradmin SG-ISE-EM-JumpboxAccess 107182 Jun 26 13:28 Arborpeakflow-backup-level0.tar.list
-sh-4.1$-sh-4.1$ du -sh * |grep Arbor
39M Arborpeakflow-backup-level0.tar
108K Arborpeakflow-backup-level0.tar.list
-sh-4.1$”
How to set root password
passwd root
It will ask you to set password for root.
How to check system file size
adminuser@Arborpeakflow:/# shell
DIAG> df -kh
Filesystem Size Used Avail Use% Mounted on
tmpfs 512M 512M 0 100% /
/dev/sda3 7.4G 1.4G 5.7G 20% /base
tmpfs 256M 12K 256M 1% /base/tmp
/dev/sda4 320G 8.5G 295G 3% /base/data
/dev/sda1 471M 118M 330M 27% /base/store
/dev/hdb 654M 654M 0 100% /cdrom
tmpfs 384M 383M 1.0M 100% /base/data/tmpfs
/base/data/tmpfs/fs 333M 5.7M 327M 2% /base/data/tmp
DIAG> cd /base/tmp/
DIAG> lsThe directory tmpfs as 100% is a problem due to a bug. This was restored after the reboot of appliance. This bug is fixed in 7.6.3.
Leader failover
On the current Leader stop the services
adminuser@Arborpeakflow:/# services sp dev lead show
Leader: Arborpeakflow
adminuser@Arborpeakflow:/# services sp backup failover show
Backup leader: Arborpeakflow
Automatic failover timeout: <unset>
Failover notification group: <unset>adminuser@Arborpeakflow:/# services sp stop
Stopping Peakflow SP services………………………..done.
On the new Leader do the failover
admin@Arborpeakflow:/# services sp device lead show
Leader: Arborpeakflowadmin@Arborpeakflow:/# services sp back fail show
Backup leader: Arborpeakflow
Automatic failover timeout: <unset>
Failover notification group: <unset>admin@Arborpeakflow:/# services sp backup failover
activate Activate failover recovery
auto Configure Automatic failover timeout
leader Configure backup leader
notification Configure Error notification group (email only)
show Show failover configuration statusadmin@Arborpeakflow:/# services sp backup failover activate
Are you sure? [n] y
Reconfiguring collectors…..done.
000: No backup task running
Stopping Peakflow SP services……….done.
Updating leader configuration…Existing Alert and Mitigation database detected.
Configuring Arborpeakflow
Leader IP: 10.1.2.12
Zone secret hash: b7a2fd3102b77366hyef848264d57149d04
Existing database: keep
Saving ArbOS configuration…
Saving SP configuration…
Boot-strap configuration committed
done.
Starting Peakflow SP services……done.
Saving ArbOS configuration…
Saving SP configuration…
Pushing SP configuration…
Warning: Configuration push failed – Peakflow SP services are not running
admin@Arborpeakflow:/# services sp show
Peakflow SP (PI) state: started”
The Heartbeat checkup between Leader and Backup Leader
The heartbeat communication happens on port 443 and this port needs to be open for communication in both directions. Could you check below:
SSH to backup leader
shell
nc -v -w 1 <leader IP> 443SSH to leader
shell
nc -v -w 1 <backup leader IP> 443”
FlowSpec troubleshooting commands
debug flowspec all
show flowspec trace manager event error
show flowspec trace client event error
show flowspec client internal
show logging | in flow
show flowspec vrf all afi-all summary internal
show flowspec vrf all afi-all internal
show tech flowspec
show bgp vrf INTERNET-VRF ipv4 flowspec summaryImportant Reference: https://www.cisco.com/c/en/us/td/docs/routers/asr9000/software/asr9k_r5-2/routing/configuration/guide/b_routing_cg52xasr9k/b_routing_cg52xasr9k_chapter_011.html
Packet Capture
DIAG> tcpdump -i eth2 -w licensetest2.pcap
tcpdump: listening on eth2, link-type EN10MB (Ethernet), capture size 65535 bytes
^C764 packets captured
764 packets received by filter
0 packets dropped by kernel
DIAG>
DIAG>DIAG> ls
ip licensetest.pcap licensetest2.pcap scp services shell system
DIAG>
DIAG> scp licensetest2.pcap adminusername@192.168.100.50:/export/home/adminusername
Password:
licensetest2.pcap 100% 146KB 146.0KB/s 00:00
DIAG>
Specific command to capture BGP TCP Flow
tcpdump -i any -s 1600 -f tcp port 179 and host 10.1.2.12 -w /base/data/soc/bgp.pcap
tcpdump -i any -s 1600 -f tcp port 179 and host x.x.x.x -w /base/data/soc/bgp.pcap
+ Ready
Syslog files
DIAG> cd /base/var/log/
DIAG> cat syslog | grep -i licens
tcpdump on firewall
[Expert@Firewall]# tcpdump -nni any host 10.1.2.12 and host 10.4.21.11”
SP Configuration in CLI
admin@Arborspappliance:/# / shell
DIAG> vi /base/etc/peakflow/save/sp.conf
SNMPV3 Testing
snmpwalk -v3 -l authPriv -u ArborCollector -a MD5 -A ‘key’ -x DES -X ‘key’ 10.4.20.11
IP Tee
admin@Arborpeakflow:/# ip tee show
NetFlow tee configuration:
NetFlow tee status: enabled, running
NetFlow tee rules:
tee 10.26.10.43:9991 10.5.10.5:2055
admin@Arborpeakflow:/#
admin@Arborpeakflow:/# ip tee add 10.26.10.43:9991 10.5.10.5:2055 rewrite
admin@Arborpeakflow:/#rewrite is used to tell Arbor to send the Tee information using its source interface as ip source. If we do not use rewrite, then the packets will have a source address of actual router.
How to check the License for Cloud Licensing
Following commands demonstrate the test method to check whether proxy is working or not.
DIAG> curl -x http://10.1.1.6:8080 -X POST -d foo=1 –verbose https://arbornetworks.compliance.flexnetoperations.com/instances/LICENSEKEY/request -o results.bin
Restarting the network services on Ubuntu
Service Networking restart
To check the netflow logs on Collector
tcpdump -ttttnnvvS -s0 -i eth0 src 10.246.129.21 and port 9991
To save in a file:
tcpdump -ttttnnvvS -s0 -i eth0 src 10.246.129.21 and port 9991 -w NetFlow.pcap”
TMS Backup Configuration
admin@TMS:/# services backup server set scp://svc_autoback@192.168.100.50/TMS UBEHbshgr96(
admin@TMS:/# services backup schedule full weekly 2 11:11
admin@TMS:/# services backup schedule incremental weekly 3 11:11
Test Syslog and Trap generation
admin@Arborpeakflow:/# services sp notification test syslog group SYSLOG
Server returned:
Success
GOOD
admin@Arborpeakflow:/# services sp notification test snmp_trap group NOC
Server returned:
Success
GOOD
For more details we can refer the adminstrative user guide.
